

Steelslinger
-
Posts
265 -
Joined
-
Last visited
-
Days Won
40
Content Type
Profiles
Forums
Gallery
Blogs
Events
Page News
Downloads
Everything posted by Steelslinger
-
Make sure you read up on each model/brand of tracks. Some are snow only and others are all-terrain.
-
Sounds very cool. I was thinking of a power lift for the plow, but unsure how to set a 'float' mode like truck plows. I have a fairly uneven gravel/dirt driveway with a touch of concrete. Using the winch is the closest to a float mode, but it offers no down pressure. I would like the down pressure of an actuator at times, though. I'm not sure an electric linear actuator would be able to have a float mode, seems like it would have to be a hydraulic system. Power dump bed is definitely on the list, maybe in the spring.
-
Pre cleaning a belt? As in how? Unless I saw something on the belt, say grease or oil, I wouldn't do anything other than a quick break in of the belt.
-
 Could you have damaged the steering box? Double check alignment?
 -
That's weird. Did you check the calipers for any obstructions? Pedal jammed at all?
-
Thank you! No Problem, glad I could offer some inspiration. Out of curiosity, what are you looking at doing with your plow?
-
Here's some video of it cycling to verify full angling and demonstrate speed https://youtu.be/NihMj_0N3IE https://youtu.be/g0D_6PuldeU
-
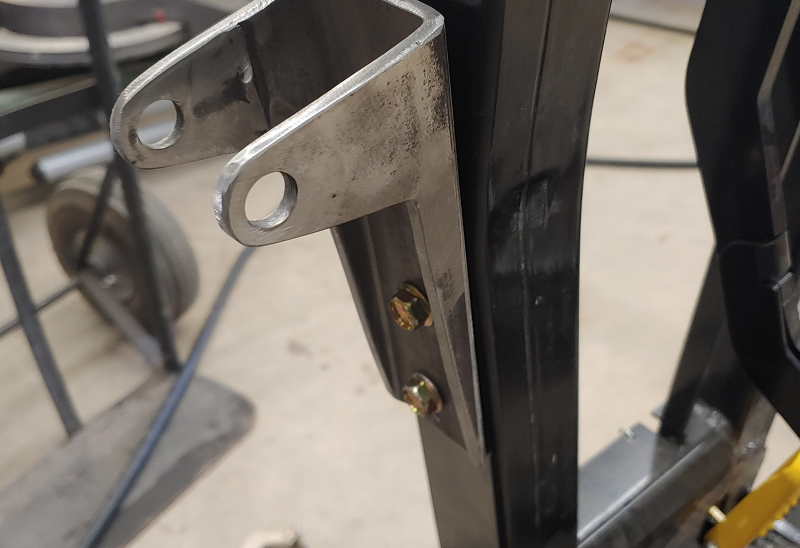
Blade side Bracket. I made a mistake in measuring the hole location in relation to the mounting location. I set the center of the hole at 3/4" from the outside bottom of the bracket. I took this dimension when the ram was closed. The problem I had is the angle the ram shaft is at would not allow it to be pinned into the bracket as the corner of the shaft hit the bracket floor. Rather than rebuild a new bracket, I just cut the window in the bracket bottom. Better solution would be to make the hole located 1" from the outside bottom of the bracket.


-
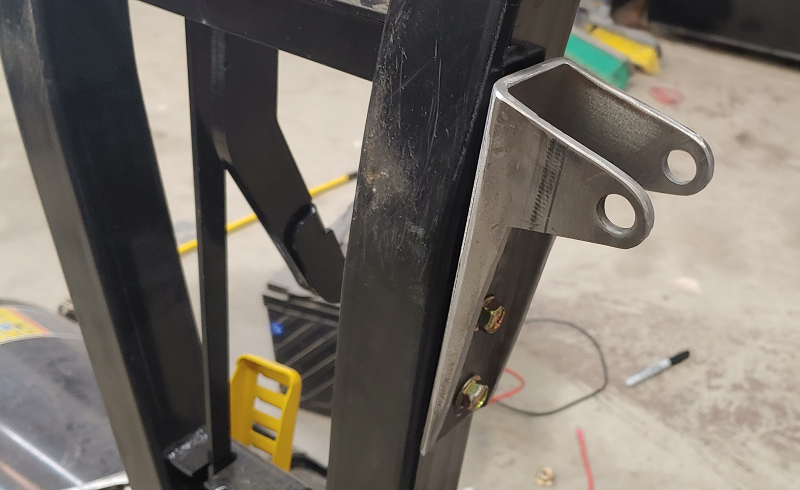
Push Tube Bracket Fit up. This is my extended bracket to accommodate the ram being longer closed than what the factory one is. If this was the Electric/Hydraulic actuator I had originally wanted, I wouldn't have had to extend it as far past the holes that exist in the tube as it is 3" shorter closed.


-
Today I started working on the ram brackets. I used 3"x2"x3/16" Rectangular Tube as the basis of the brackets to save time and energy. I did some basic fit up and rough guestimate measurements. First blade bracket caused the stroke to be too short to get angled all the way drivers side. Had me worried for a bit until I realized my error in moving the blade side bracket too far away from the pivot thinking it would shorten the offset when closed. It works best centered on the two mounting holes.


-
I used the GS brackets for a Jeep and modified them to mount my 50" Rough Country Straight LED bar.
-
So I've only just started at looking at getting this going and ran into an issue. If you use the existing holes on the push tube and blade (Can Am Promount), you will want a actuator/ram that is around 14" in length closed, with 8" of stroke. The cheaper 8" linear actuators (lighter duty, 650 lbs or so) will fit fine. The electric over hydraulic unit I was looking at, had a closed length around 14" but a stroke of 9.5" roughly, which will work just more stroke than needed. The actuator I bought, 8" 2000lbs model, has a closed length of 17.875" with 8" of travel. This length takes it past the factory holes on the push tube, but also puts it just past the bend in the tubes. So, I need to work out offset and alignment to prevent flexing or binding.
-

-
Here's a picture with one of the pins circled.

-
From some of the pictures I have seen of the internals, there is a gear just under the turf shift fork with three or four pins. It's these pins that slip out of their pocket and slam into the shift fork for the turf mode when the gears are rotating. I believe if you rebuild (or as a preventative, go in prior to failure) make sure the pins are seated tight and then stake the edge of the hole in the gear, should stop them from working their way out.
-
I have not found a pre-made extension for the seat belt as of yet. Just went with the $6 eBay sensor bypass. Bearing Greaser is 30mm I believe. I would say you'd be safe with once a year.
-
Seizmik Break Away mirrors are $72 and the XS power stud is $12, so you save a little over factory. The Seizmik used to be cheaper ($65 and $10 for studs) so it was a better deal than the $100 for OEMs. Other big factor in favor of Seizmik is Lifetime Unlimited Warranty.
-
The parts list: I am using a Can-Am Promount 72" plow on my '19 Max XT Cab with the factory winch for the base plow system. The muscle of this system is a Progressive Automation 12vdc 8" Linear Actuator with 2000lbs dynamic force/4000lbs static force. All electrical, metal worm gear with a stainless steel main shaft. It can be found on Amazon (and Progressive Automations site) for around $310 USD, I got mine on Amazon on sale for $265 USD. You could go lighter weight for cheaper, $100 USD would get you an 8" actuator with a max limit of 660lbs of static force using an aluminum piston with plastic gears. Or, you can go heavier and more cash and get an electric over hydraulic ram for $500+ USD (original route I wanted to go, but backordered for months). Edited to add, biggest draw back to the actuator I chose is the travel speed, it's 0.33" per second (24 secs to go from one full angle to the other) or about 3 seconds for 1" of travel. All about Control. I don't like the factory winch switch for plowing, and didn't want to add another for the actuator, this is personal preference and you could make the setup easier and cheaper if you wish to go that route. would work just fine. Instead, I wanted a handheld like a truck plow setup, but too spendy and possibly difficult to adapt, so I went another route. I am using a Progressive Automation 4-way Joystick (they also have ball topped style). It uses 4 SPST naturally open switches. Center position is all switches open circuit, self centering, no diagonal movement and safe guards running winch and actuator simultaneously. Plan is obviously Up-Down wired to the factory winch solenoid for raising and lowering. Left-Right will be wired to a second winch solenoid to control angling. Warning: Reason for this is the switch is a 10amp max where as the actuator is 20amp max at max load, so you need to run relays and using the solenoid is a cleaner and faster way to do it. Cost is $35 USD from either Amazon or Progressive Automation's website. I picked up a generic UTV winch solenoid on Amazon for $26 USD. I plan to use a 2-wire Delphi waterproof connector for the 12awg wire (with 20amp inline fuse) running to the actuator from the solenoid so I can disconnect power when removing the plow, and have all the wiring routed and installed in the machine for a clean look. For the controller, I am going to build a removeable arm rest to house the joystick and wiring (with 10amp inline fuse) will run under the floor and come up under the dash one end, and center seat at the other. A 6-pin Deutsch connector will provide disconnect and removability. If you opt for a dash switch to run the actuator, you would skip this.


-
After seeing a few posts other places about ways to repair the factory power angling system, I got thinking about building my own setup. While I would love to have one of the full featured V-Plows from Boss or Western, I have neither the money nor the need for such setup to justify it to myself to buy. However, I am all about DIY projects that make life easier and maybe save money doing it. This will involve some metal fabrication and welding (building brackets and controller mount/box depending on how you want to operate the setup), mechanical and electrical work. The plan: Using a 12v 8" Linear Actuator to angle the plow blade, controlled by a 4-way Joystick switch (which will also operate the winch for raise/lowering). To Do: Create brackets to hold the actuator on blade and push tubes, fabricate a removeable arm rest to house joystick controller, add second winch solenoid to act as relay/contactor for the actuator, wire up harness that can be left in machine but disconnect at front bumper for plow removal and disconnect under seats for removal of controller arm rest when plow season is over. Cost: Base price of $450, does not include steel for brackets or aluminum I plan to use for controller arm rest. I'm figuring about $50 or less in steel and aluminum. I should have all of the necessary stuff by this weekend to get started. I'll post as I go.
-
You could also splice together extensions if you are confident in your soldering skills. Pick up some appropriately sized wire, heat shrink tubing and good solder. Cut off the rings, slide several individual pieces of heat shrink on to one of the wires, mesh the ends together, solder them together, then slide one piece of heat shrink over the bare area, shrink it, then slide the next, etc. maybe 3 or 4 layers to build good insulation.
-
You might have to pull the cables back through the dash and reroute that way, though you will have to find a route around the radiator. Otherwise, you could make some new cables, attach them to the old ones prior to pulling them through the front wall. Then pull them through, trim to length.
-
Winch Solenoid Location?
Steelslinger replied to Steelslinger's topic in Defender Lighting, Sound, and Electrical
That wouldn't be horrible, only need to add two wires from the joystick switch. My biggest concern is whether it even has a solenoid/relay setup or if the dash switch is acting as the solenoid as in a reversing switch. In which case I would need to run a separate relay and power wires to the winch itself. -
I haven't gone digging yet, but was wondering if anyone knew the location of the factory winch solenoid on a '19 defender? Need to tie a second switch (joystick style) in to it.
-
Snow Plowing Lights
Steelslinger replied to Mark in Colorado's topic in Defender Lighting, Sound, and Electrical
Looks good. I went with a light bar, but got to thinking about putting lights on the plow frame/push tubes, similar to pickup plows. -
Does it go away after it dries out? If it only happens after you wash it, I would say water is getting into something, probably electrical, and causing problems. I'd start by checking fuel pump plug and ignition electrical plug, check the seal and see if there is water in the contact area. Add dielectric grease to your electrical plugs.


